


Here are the recommended steps for a DIY grid tied installation!
- Have a site analysis done to determine feasibility, and type and size of system and approximate cost and return on investment. We recommend this be done by someone such as ourselves who is not part of a sales motivated installation company, so our advice as to proceed or not can be impartial. A sales and installation company may also have rosy projections of the return on investment that is not based on a thorough study of your site, since they may not do an in-person site assessment, but use rules of thumb.
- If our site assessment indicates your site is suitable, then:
- Apply to your local hydro to determine if they have the grid capacity to enable you to upgrade to net metering.
- We can help provide the text for the "brief description of the project" that the application requires.
- We deliver a site assessment document to you in electronic format that you can use to describe your system, and show a bank that this project is economically viable.
Click to view different mounting system types.
- Obtain some quotes for important system components of the recommended type and size of system, panels, inverters, mounting system, dual meter base, DC disconnect, AC disconnect, rooftop combiner, underground #6 cable, grounding cable, grounding clips, WEEBs and stainless steel hardware, and increase in insurance premium. We have a worksheet that we can give you after a site analysis to help determine the type and quantity of miscellaneous parts that you can buy locally.
- We can sell you a kit the Panels, Inverters and racking systems at a very competitive cost, if you wish. We offer paid DIY support services independent of you choice to buy any components through us.
- For an idea of what the parts will cost we have created a costed package of parts for a typical plain bungalow with an ashphalt shingled gable roof. This example is the easiest type of buiding to do a solar installation. Click to view this this package.
- If doing a ballasted roof mount, get a Structural Engineer's study of your roof to confirm your roof can support the load, and to ensure your insurance company covers your roof with this installed.
- Do a financial analysis of the project. If you provide us the contact cost, we can re-run the financial analysis and supply an updated set of numbers for that price.
- Decide if you wish to proceed. If so then:
- Apply to your the local distribution company, (Hydro One, Ottawa Hydro, etc) for a connection offer, to be certain they can connect you to the grid, and no capacity limits will apply to you.
- While waiting, re-roof the roof if it won't last another 20 to 25 years (and you choose to roof mount)
- While waiting, apply for a building permit for roof mounted systems. If you are planing a ground mounted system, check with your local municipality if they have any restrictions.
- Talk to the local distribution company, (Hydro One, Ottawa Hydro, etc) and discuss their requirements.
- Obtain ESA inspection permit(s) for the job, or if you are planing to hire an electrician to hook up to your panel have the electrician apply for a permit.
- Order the parts for your system.
- Complete the connection offer from your local hydro, and pay the connection fee. You should pay the connection fee so that the Hydro company's paperwork does not hold up getting connected once construction is completed. We recommend doing this as soon as you have ordered the parts.
- Note: you don't need to be an electrician to do the wiring if you are the homeowner and understand how to do the wiring, but if you hire someone to do the wiring they must have an electrician's license and take out an ESA permit.
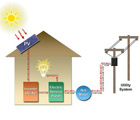
- Steps to Install the Net Metering
system
(using a string inverter, 10kW or less)
- Put in footings/posts to support a ground mount or pole mounted system
- Build / assemble the mounting system (racking)
- Mount the panels on the mounting system, and wire up the modules as you go
- Run the wires to the combiner box or to a rapid shutdown box if a roof mounted.
- If a ground mount dig the trench from the PV system to the inverters if they are mounted indoors and put in conduit to hold the PV wires
- Run the ground wires from a ground rod or ground plate to the racking.
- Run the DC wires from the panels to the rapid shutdown device and then through conduit to the inverter
- Mount the inverter and AC combiners if using more than 1 inverter (unlikely)
- Wire the inverter, and AC disconnect. Loctate the top of the AC disconnect 1.2 to 1.8m above the finished grade, and near the meter if practical in a highly visible and accessible location.
- Run a wire from the AC disconnect to your existing breaker panel and add a dual 60A breaker to the panel.
- Put on all the labels that are required.
- Have the ESA inspect the system, and authorize it as ready for connection to the grid
- Install rodent proofing mesh if a roof mounted system.
- When you are connected to the grid, the local utility supplies a bi-directional meter to plug into the existing meter base. The cost of this meter is included in the bundled set of charges that you pay the utility to connect you to the grid.
- Once connected to the grid and you have full sun, measure the system's output to verify it is working correctly. Your inverter should supply you with this data. If not, then this may require electrical measuring tools that most DIYers would not own.
Summary:
DIY (Do it Yourself) electrical wiring of a Photovoltaic system is permitted, and the ESA has no objection to the homeowner doing 100% of the work themselves, as long as they possess the appropriate skills. They also support homeowners that wish to do the majority of the work, and hire out tasks that they are not comfortable doing, frequently this involves contracting the AC wiring to an electrician. You may also wish to hire or otherwise obtain assistance when bolting on panels on a steep roof, and obtain fall prevention harnesses. By doing it totally DIY you may save up to 30 to 40% of the cost of the project.
We offer our consulting service to homeowners that wish to have a DIY installation that will complement your skills, and enable you to undertake this project with confidence. We can do any or all of the following items:
- Help you make a detailed estimated cost of the system
- We can sell you a kit of high quality panels, inverters, racking and balance of system items at an attractive price at below retail prices
- Selecting the best mounting system. We can sell you commercial products, or see our page on methods to make a DIY ground mount racking system.
- Explaining how to assemble the mounting system and how to install the panels.
- We can help you design a ground mounted mounting system for even greater savings.
- Explain how to meet the ESA's requirements for grounding the system
- Explain how to wire the DC side of the system
- Explain how to wire the AC side of the system, and help you decide if you need to hire an electrician
- For an hourly fee, come to your site and show you how to put the system together.